Showing posts with label DIY. Show all posts

Monday, April 3, 2017

Air Plant Ideas: Upside Down Sea Urchin Shells for Jellyfish Look

air plant jelly fish with sea urchin shells
Large air plant sea urchin shell jellyfish

I'm not really into the whole air plant thing, but maybe I should be from the looks of this cool idea! I was at Wasson Nursery in Fishers and saw these air plants in sea urchin shells suspended to look like jelly fish. Now that's pretty cool! I don't know much about air plants, but it looks pretty straight forward, I wonder if I could make these myself?


On Amazon you can buy a set of 3 for $33, that's like $10 each! You can also just buy air plants and then buy sea urchin shells and I bet you can just stick one in each hole and that's about it. Ok actually I just looked it up, and the video below shows how you can do it with literally a piece of string, you don't even glue it or anything. I guess I'm a little late to the party with this craft idea, they seem to be everywhere!

Air plants in sea urchin shells


Wednesday, March 29, 2017

Dum Dum Candy Sucker Topiary Tree with Supplies

I was searching online for something to do with suckers or lollipops and I came across a photo of a topiary tree or large flower made out of lots of individual dum dum suckers. I'm not very crafty - the only other craft I've really tried is a money Christmas tree. Here is my supply list so you know what supplies you'll need if you want to try to make it (I had to run back out to get extra suckers), and a few photos to show the steps I took along the way. No biggie!

make a sucker ball on a stem like a flower
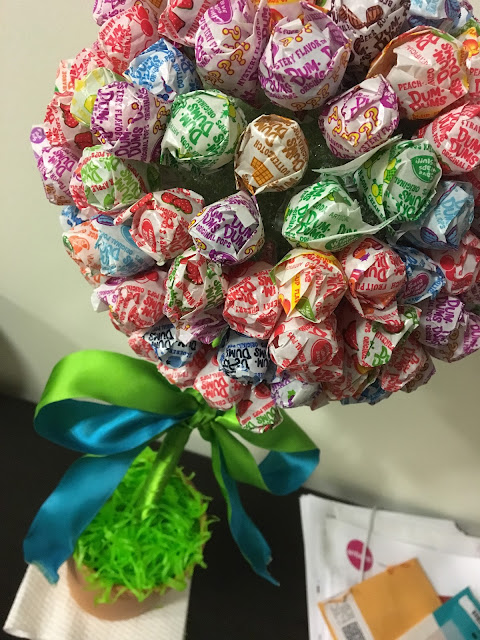
The final product, this dum-dum lollipop topiary tree stands 22 inches tall. It's rather top heavy because it has almost 3 pounds of suckers on top.

You can use whatever you want, it will probably turn out just fine, but here's what I used if you're curious:

  • Clay flower pot (4 1/2 inch diameter)
  • Green foam block (the kind used for fake flower arrangements)
  • Green Easter grass
  • Wooden rod (1/2 inch diameter) 16 inches long (or however tall you want it)
  • Double sided ribbon
  • Green foam sphere (Hobby Lobby flower arranging section)
  • 3 lbs of Dum-Dums (3x 1 lb bags = approximately 70 per bag or around 210 suckers)
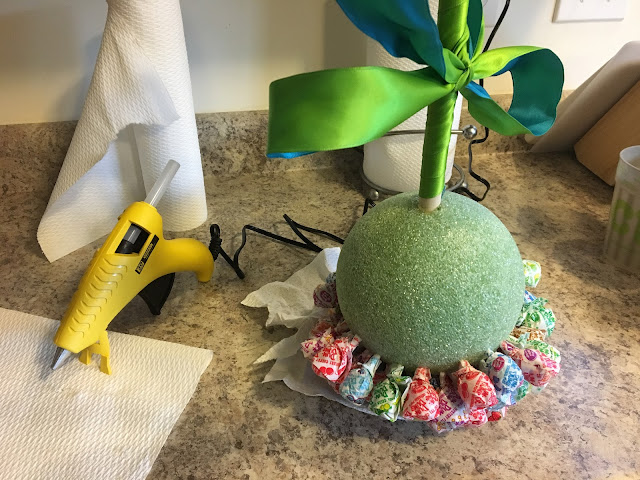
  • Hot glue gun (to hold the wooden rod tight, not to glue the suckers in)
Quick suggestion, get way more suckers than you think you'll need! The surface area of the sphere is deceptive, and I had to run out to buy more suckers. Get a huge bag just in case. 


Okay here is what I did...

green flower arranging foam in pot
I cut the sides off the green foam block and shoved it down into the flower pot, then I cut a little more out so it didn't stick over the top.

sucker topiary tree supplies
Gathered up more of my supplies, including the foam ball, suckers, Easter grass, and nice double sided ribbon

stick dum dums into foam ball
I started sticking the suckers in very close together, then realized the ball got top heavy, so I set it on top of the pot and kept sticking more in. If you go very close together, you better buy extra suckers. I have a little space between mine because it's fine either way, it still has the overall look.

hot glue rod into foam ball with suckers
I anchored the ribbon to the wood with glue, then wrapped the rod and glued it down to keep it tight. I tied a bow around the rod and used a dab of glue to hold it down. I stuck a letter opener into the foam ball and twisted it to make a hole, then jammed the rod into it with some hot glue on the end.

lollipop topiary close up photo
I jammed the rod into the foam block in the pot then glued it to hold it in place. This thing is very top heavy, so I'm a little worried about the base coming loose. I used a very tiny amount of Easter grass just to cover the foam block. The hardest part was keeping it straight up and down while the glue dried. Remember it doesn't have to be perfect!

Any questions? Like I said, I'm not a huge craft guy, but you can leave a comment and I'll answer. I've got to drive this in to work for a work party, and I'm going to bring a bunch of extra suckers in case these fall out. The suckers aren't actually glued in they're just stuck in place. 

Saturday, March 4, 2017

21 Inch Tall Rabbit Fence with Zip Ties

So I wrote a whole blog post about adding a 9 inch tall welded wire fence around the base of my aluminum fence in order to keep my small dog(s) in the yard. The aluminum fence is attractive, but the rungs are a little to wide to keep the dogs in if they are motivated to wiggle out. The 9 inch tall addition did the trick no problem, but I noticed that it did absolutely nothing about the rabbits. I was aggravated to no end all last spring, especially when they decapitated my Dusseldorf Pride.


I would let the dogs out at night and watch the rabbits run away and simply jump the 9 inch fence between the rungs, no problem. Since I actually watched them hop it a few times, I was guessing that 21 inches would be enough to prevent them from getting in. They might be able to clear 21 inches if it were out in the open, but since they also have to aim through the vertical rungs I'm hoping this will be tall enough to stop them. The whole point of having an attractive aluminum fence is so you don't have to have this wire mesh or chain link. I think at 21 inches tall, it's still subtle enough that the overall impression of the fence isn't too tacky.

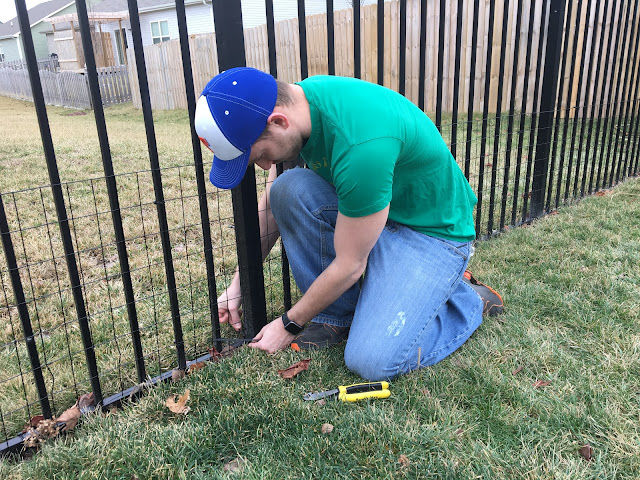
This spring, I'm not messing around, I bought the same kind of fence from last time: 16 gauge black vinyl coated welded wire fence with 2"x3" rectangles. I used zip ties to hold it in place, just like last time. With a little help from my super handy room mate, we installed it in a couple hours.

install rabbit fence with zip ties
Each rectangle is 3 inches tall so we have 7 rectangles vertical for 21 inch fence that should be enough to keep the rabbits from simply jumping over. They might be able to clear 21 inches if it were out in the open, but along with the aluminum fence it should be enough of an obstacle - fingers crossed. 

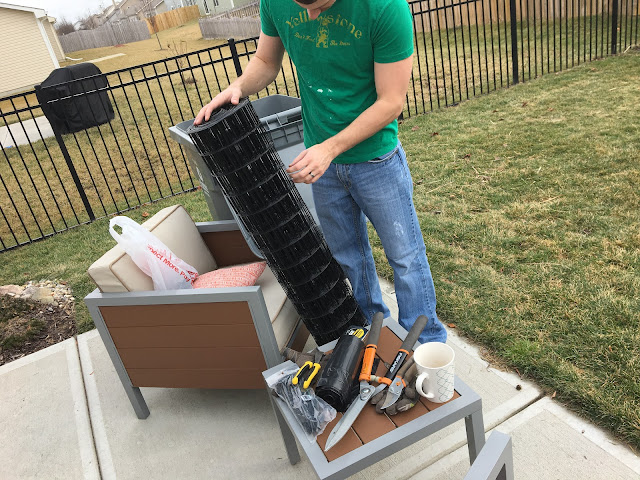
rabbit fence supplies

Of course after the fence was in place, it only took the rabbits a day or so to find the gaps around the bottom where they could just duck under and get in. So then I took a spare piece of fence and stuck it into the ground temporarily blocking the low spot where they got in.

rabbit dig under fence
Rabbits found the low spot, and slipped under the temporary block with this spare piece of fence. My next step was to dig the tongs 3 inches into the ground and add some fill to actually raise the ground level in this spot. 

As you can see from the photo, they actually dug under that and bent the tong back that was touching the ground. Arrrg! That does it! I cut off a strip and stuck the wires 3 inches into the ground and had extra rectangles at the top, then I filled that in with some left over soil and sod scraps to actually raise the level of the ground up to the fence. So far so good, no rabbit poop in the yard since adding the bottom layer in these particular low spots.

Tuesday, January 6, 2015

DIY Keep Small Dog in Yard with Welded Wire Aluminum Fence Addition

I have a small dog and an aluminum fence, and everything was going fine until she got a really short haircut and the diagonal backyard neighbors started leaving their dog out on a lead. It was only a matter of time, and sure enough she wiggled her little booty between those bars and went running toward the other dog. I didn't even know she could fit! Now I'm worried she's learned that she can fit, and I won't be able to let her out of my sight - defeating the peace of mind the fence provided in the first place!


I searched online and found a variety of options for dogs who dig under or leap over fences, suggestions for dogs who squeeze through railings (such as Puppy Bumpers), options for climbers, and finally this article from WolfDogProject.com that gave tons of great ideas with photos.

My dog, Katie, is only 9.5 pounds and stands about 12 inches tall. I knew I just needed something about her chest height to keep her from wiggling through - I knew she wouldn't be able to make it through mid-jump, so if I could keep her from squeezing with her feet on the ground that would be enough.

I even thought about using those border edging decorative fence pieces all the way around, but that would be very expensive even in my tiny yard.

I ended up buying a roll of black vinyl-coated welded wire fencing, 4 feet tall by 50 feet long, with 2 inch x 3 inch rectangles. I have about 130 linear feet of fence, so I figured I wouldn't need to go 4 feet tall all the way around, and one roll should do it at about 9 inches tall all the way around.

Final product - 16 gauge black vinyl coated welded wire fence pieces, 9 inches tall, attached with black zip ties.
I ended up getting 16 gauge in black to match the aluminum fence. 16 gauge was super bendy, and I was worried that I wouldn't be able to get a straight line out of it. I spent so much money on the aluminum fence, the last thing I wanted to do is make it look like a tacky temporary solution or junky eye-sore. 16 gauge was soft and easy to cut with wire cutters - lucky thing too because I had a lot of cuts to make.

roll of black vinyl coated welded wire fencing
All the fencing I need for under $100. 16 gauge 4 feet x 50 feet with 2"x3" boxes black vinyl coated welded wire

roll of black vinyl coated welded wire fencing
Paranoid about getting my fingers caught in the fencing...

roll of black vinyl coated welded wire fencing
The 50 feet of welded wire did NOT want to stay unrolled.

hold welded wire fence down with rocks
I put rocks on the fence to keep it from rolling up again, and went along and bent the fence every few feet in the other direction to train it flat. Watch your eyes with those wire pieces rolling up on you!

welded wire fencing and tools
I tried kitchen scissors and garden sheers, but wire cutters worked much better.

black zip tieswire cutters

zip tie wire fence to alunimum fence
I attached the welded wire fence to the aluminum fence with black zip ties. I started by cutting out 6 foot sections and putting them within the main posts, but eventually decided to just wrap long 25 foot pieces around and keep them tight with zip ties - it was a lot less cutting.
Up close the wire is not as straight as I would like, but the big picture general impression is hardly noticable. The whole point is that it blends into the background and I don't have to think about it again. All in all I made something like 900 individual wire cuts. Spring loaded wire cutters would have been super handy if they re-open automatically after each cut.

snorkie puppy
Now Katie is safe and I can let her out to pee in the middle of the night without a leash! Finally!