Monday, March 17, 2025

Bald Cypress in Front Yard Replacing Wind Damaged Linden Tree

Nature has a way of making decisions for us sometimes. In my case, it was a strong gust of wind that reshaped the look of my front yard. For years, I had a small linden tree standing there, providing shade and a bit of greenery. But one stormy day, the wind proved too much for it. The tree snapped in half, leaving me with a difficult choice: what to plant there instead?

Taxodium distichum bald cypress in front yard

It was a bit sad to see the linden go. It had been a part of my yard for a while, but once it was damaged beyond saving, there was no point in keeping a broken tree around. 

RIP linden tree broken in wind

With the old tree gone, I had the perfect opportunity to upgrade. After some research, I settled on planting a bald cypress. Why? Because bald cypress is an incredible tree. It’s unique, hardy, and has a striking appearance. Unlike the linden, which was relatively small and modest, the bald cypress has the potential to grow into something truly majestic.

person standing next to bald cypress at garden center for scale

Bald cypresses are known for their feathery, bright green needles that turn a stunning rusty orange in the fall. They can grow tall—really tall—sometimes reaching heights of 70 feet or more. The best part? My front yard now has plenty of space for it to spread out and thrive.

bald cypress barely fits in SUV

Rather than leaving an unsightly hole in my yard, I decided to make it look like the linden had never even been there. I carefully cut out a patch of sod, removed the stump, and then laid the sod back over the spot. It was like a magic trick—the old tree was gone, and the lawn looked untouched, as if the builders had never planted a linden there in the first place.

small tree stump in front yard
The small linden stump was taken out with an axe and the sod from the new bald cypress hole perfectly fit

spot in yard circled in red showing where tree used to be
You can't even tell there used to be a tree there!

In a way, that storm did me a favor. It gave me the push I needed to replace the linden with a tree that will grow into something truly spectacular. Years from now, when I look at the towering bald cypress, I’ll remember how it all started—with a gust of wind and a fresh start.

Turn Off a Single Sprinkler Head While Leaving the Rest On

That's right baby, we had a super hot June so I bit the bullet and got a sprinkler system installed. But after it was installed, I noticed one spot in the side yard would get way too soggy and hold water. I wanted to turn off just one of the heads, but how? I tried twisting it and just making it very low flow, but it would still fill the area with water - plus my neighbor has sprinklers aiming at the same exact spot. 
sprinkler head popping up through grass with a shut off nozzle to turn off single sprinkler head

After doing some research online and watching about a dozen YouTube videos, I found out it's really hard to permanently turn off a single sprinkler head, but it is possible. I also found that luckily the head I was trying to turn off was this Hunter kind, and I found they sell tips for it. You can buy a nozzle that is basically a shut off nozzle, it's just a small cap that is threaded to go on where the spray tip would normally go. 

red sprinkler nozzle that was replaced with a shut off turn off single only one sprinkler at a time

To install it you pull up on the head (hard enough because the spring is trying to pull it back down) and then unscrew the tip with the sprayer and replace with the solid plastic nozzle cap. 

sprinklers in back yard with black fence
These longer range sprayers (black cap on top) don't have an easy shut off nozzle that screws on, just the colored Hunter kind like the red one above.

It worked like a charm on my very first try, I kept the tip in a drawer and I actually put it back on for when they came to blow out the system in the fall because I wasn't sure if having a solid stop nozzle would do anything when they are trying to blow it out. But once they turn it back on, I can just go unscrew the red cap and put the solid one on again. 

The Hunter shut off nozzle was 3 for $2 on Sprinkler Supply or you can get one at a time on Amazon but they are more expensive. The part was called Hunter - 916400SP - Hunter Pro-Spray Shut-Off Nozzle Cap / Nozzle.


print off of satellite photo of yard with marker drawn to show sprinkler lines
Had sprinkler install company draw with marker on a map of my house showing where they put the lines

For reference if anyone is curious, we have 0.27 acres and ended up getting 6 zones for $5344 about 32 sprinkler heads I think. I got the company to draw where they put the lines, they normally say just take a bunch of pictures of your yard after it's installed, but I had a print off ready and said draw with a marker where you put everything. 

progress photo one month after sprinkler installed
One month after sprinkler install


progress photo two months after sprinkler system installed in small yard
Two months after sprinkler install


Saturday, July 15, 2023

Hand Pick Japanese Beetles from Plants (No Traps) and Other Tips

It's that time of the year when you start to notice Japanese beetles getting into your yard and eating your trees and shrubs. They are quite beautiful beetles actually with rainbow oil slick looking wing coverings and they are harmless to humans because they don't bite or sting. But they will run rampant in the yard if you are not on the lookout for them. Here are a few tips I've picked up over the years dealing with Japanese beetles. 

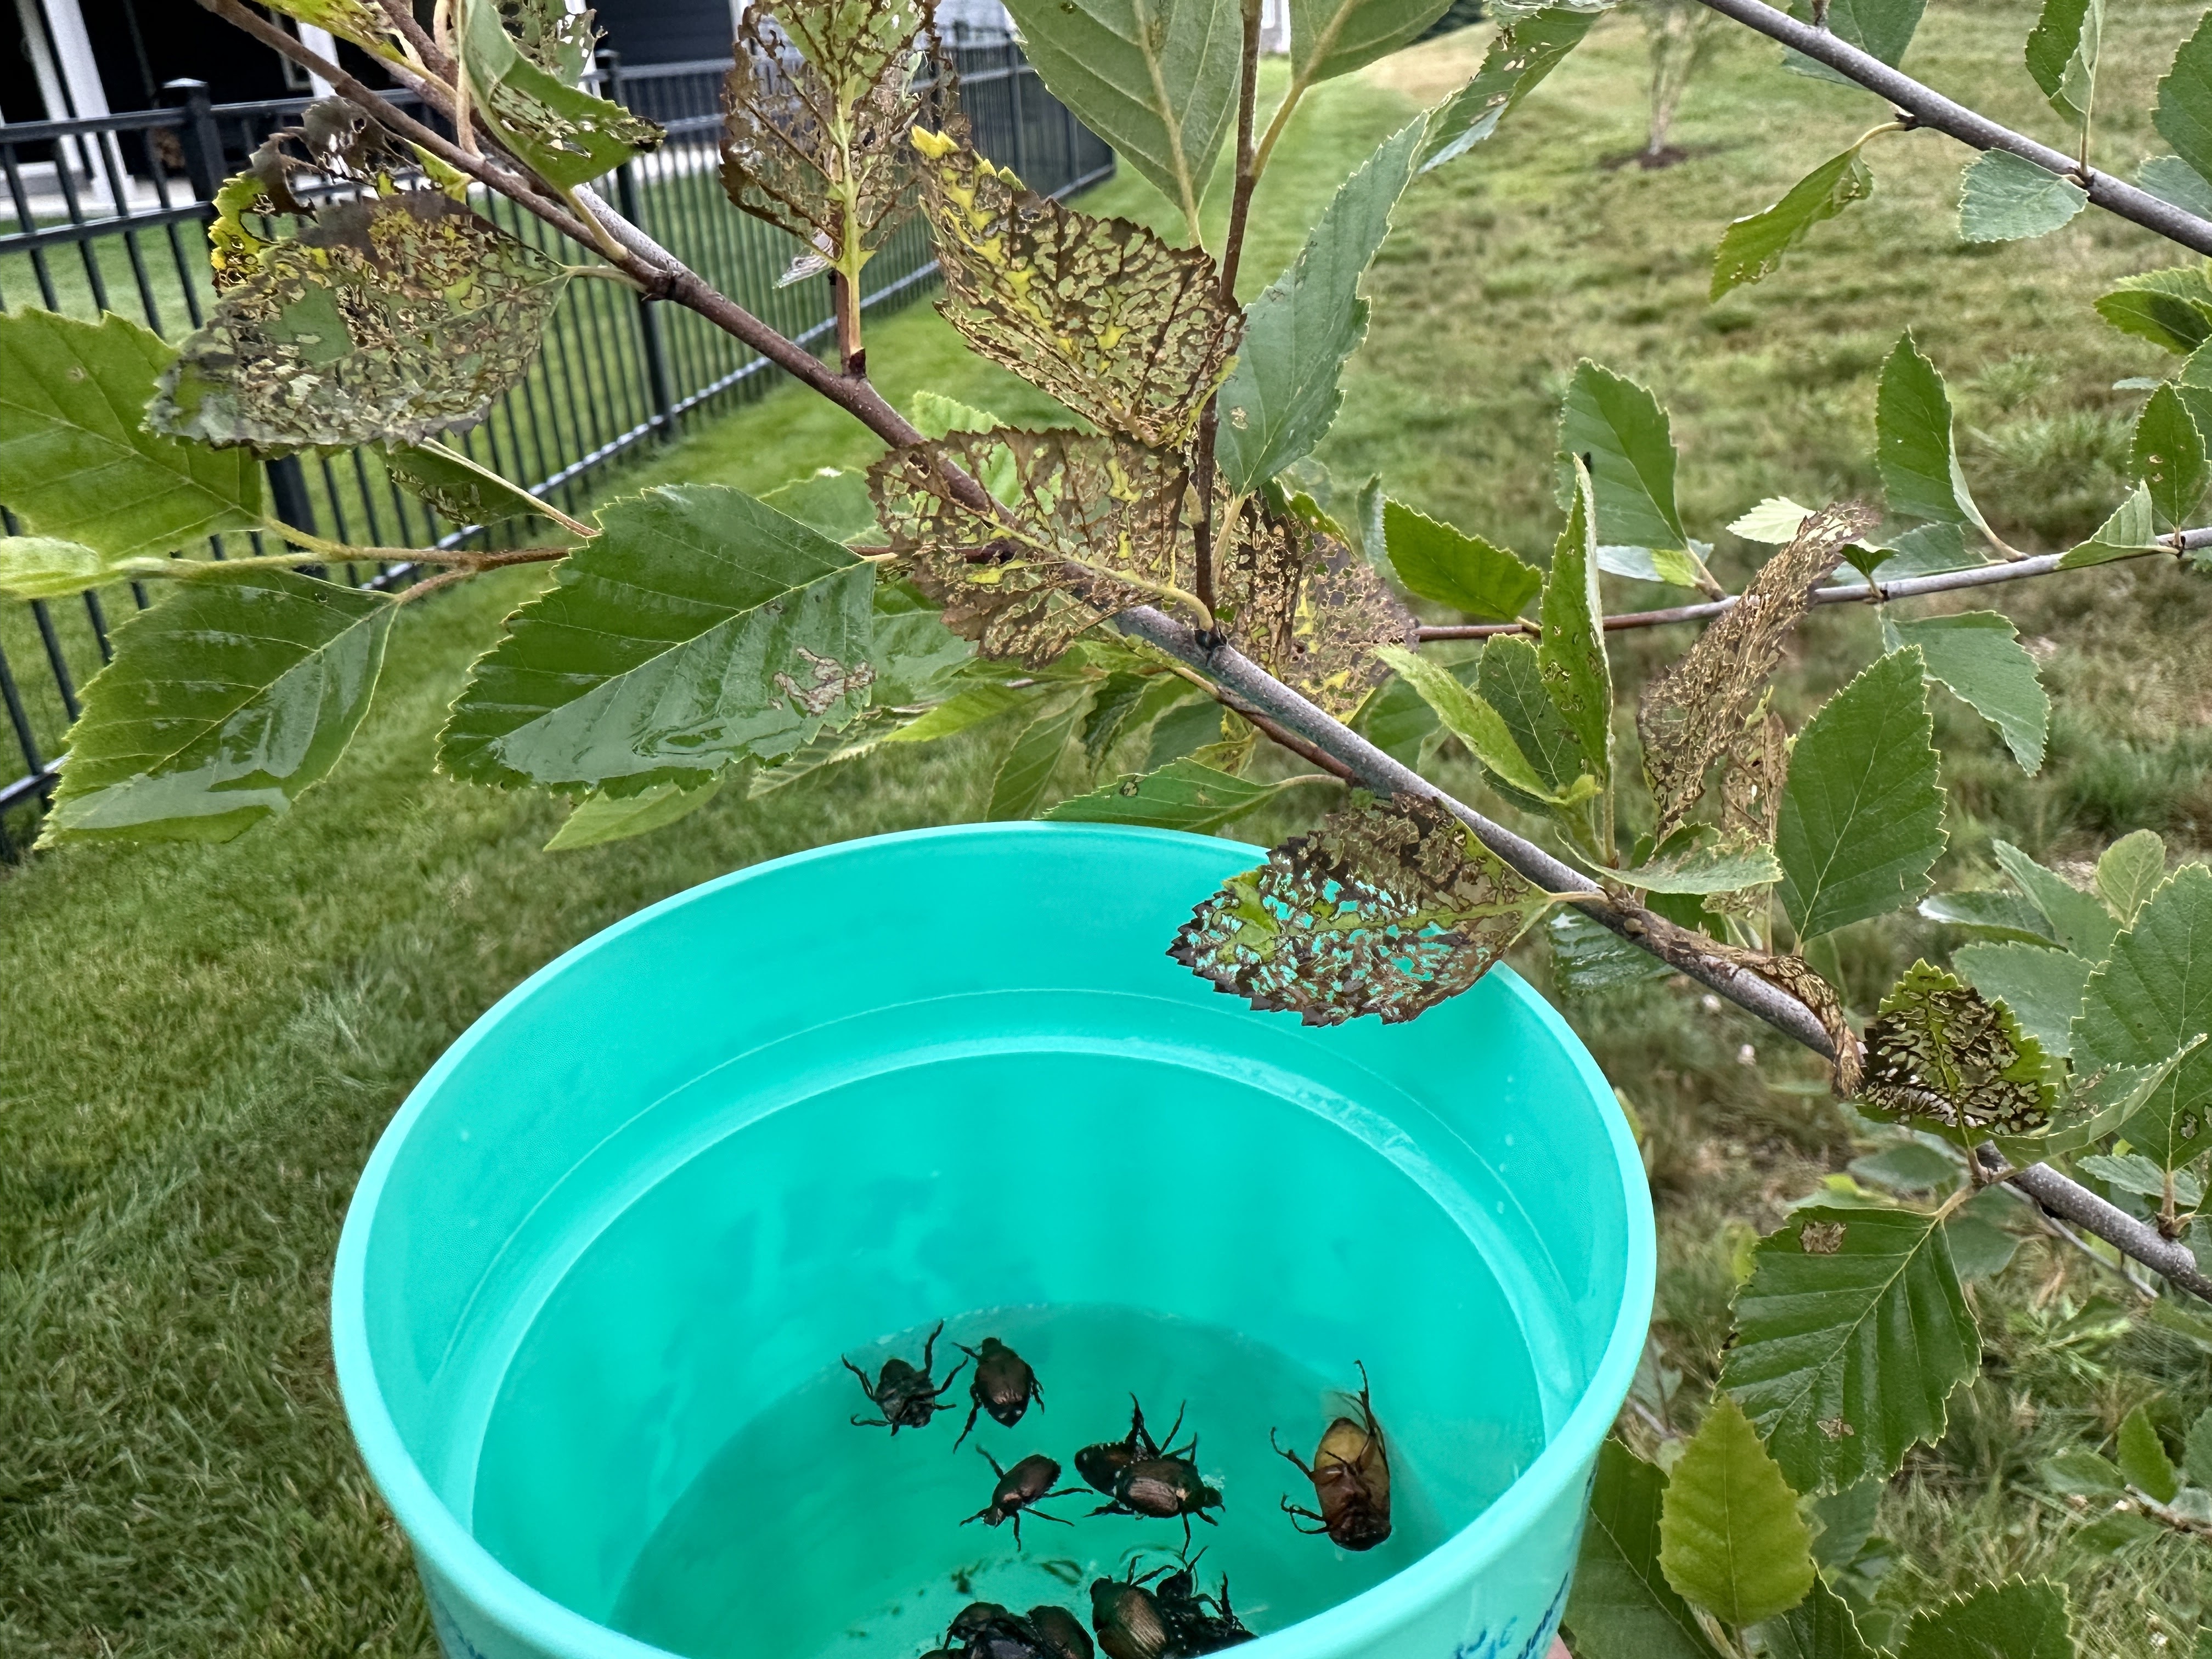
1. Look for their characteristic "skeletonized" leaves - the beetles eat the fleshy part of the leaf and leave the veins, so if you see skeleton leaves this is a tell tale sign of Japanese beetle damage. 

identify japanese beetle leaf damage

2. Hand picking Japanese beetles from plants can be effective early intervention and prevention - If your yard is not yet overrun and you just notice a few, pick them off the plants and get rid of them. When they feed they release a scent that attracts EVEN MORE Japanese beetles, basically ringing the dinner bell. You don't need to spray insect killer on your whole plant or yard just because you see a few, but remember they are sending out an invisible signal to their friends. 

japanese beetles fall into cup of water

The technique I like to use to get them off the plants is to hold a cup of water under them before I grab them. When they are disturbed their defense mechanism is to drop to the ground, so if you are trying to get them by hand they might slip away. If you hold a cup of water under them first they will drop into the water. They are lousy swimmers and the water will prevent them from flying away as you walk around the yard looking for more. This is also why you see people put buckets of water underneath Japanese beetle traps to catch the ones that fall off. 


3. Do not use traps - Remember how I said the Japanese beetles release a scent that attracts other beetles to the feast? The bait used in Japanese beetle traps uses the same scene, essentially attracting EVEN MORE to your yard. I heard a funny expression once that Japanese beetle traps are the perfect gift for your neighbor 5 houses down. If things get really bad I just end up spraying my trees with an insect killer spray. 

japanese beetle trap hanging with bucket of water

4. Remember the plants that usually get hit - In my yard I can usually spot them on Buckthorn Fineline, River Birch, and Linden trees. These seem to be their favorite at least where I live. I never see them on boxwoods or roses for example, so I don't bother looking there unless I see "skeletonized" leaves first. 

japanese beetles on buckthorn fine line leaves


Friday, September 30, 2022

Sweetbay Magnolia Seeds and Fruit

What does the fruit of sweetbay magnolia look like? I guess I never expected a magnolia tree to have bright red seeds and a big pineapple looking fruit pod on it. Obviously magnolia does have a nice flower on it so if the flower is pollenated it's going to turn into something. It looks bizarre because you never really see photos of magnolia tree seed pods like this. 


As the fruit ripens it bursts open revealing bright red seeds inside. I didn't see any seeds on the ground so I think the birds are eating them. Maybe the bright red color attracts birds to help them find the seeds to eat so they can spread the seeds further across the region. 

Sweetbay Magnolia Seeds and Fruit

sweetbay magnolia seed pod

Here's a picture of my young Sweetbay Magnolia tree on the west side of my morning room so you get an idea of the size and location of the tree. 


And here is the magnolia flower blooming earlier in the year before it was pollenated. 

photo of sweetbay magnolia flowers blooming


Friday, July 1, 2022

DIY Get Rid of Dog Vomit Fungus in Mulch Bed

Have you ever seen what looks like dog vomit or scrambled eggs show up in your mulch bed on a hot summer day after a heavy rain or watering your lawn at night? I watered at night and ended up with this fungus that looks like my dog ate something and barfed right in the mulch. Turns out this stuff is actually called dog vomit slime mold, and it's a protist not a fungus technically. If the vomit looking part matures it releases clouds of brown spores in order to spread to new areas. It's virtually impossible to get rid of, but I found a DIY way to control it that is easy to do and inexpensive. 

Dog vomit slime mold in mulch bed

If you see the dog vomit slime mold looking like this when it is still yellow, like scrambled eggs, then it is not too late to treat it. If it already has a hard dry outer shell then the inside is already packed with brown spores. The spores are hydrophobic meaning they repel water, so spraying it with the hose actually causes the spores to spread even more. 

spray bottle with vinegar treat dog vomit fungus

If you catch it early while it is still yellow like this, spray it with white vinegar. This is a mild acid, and I wouldn't recommend doing it right next to a sensitive plant. But I did it next to some bushes and it was fine. I sprayed the dog vomit slime mold with vinegar and saw the tops start to melt away. Take that!


spray dog vomit slime mold with vinegar
Dog vomit fungus melting away with vinegar

24 hours later the parts I sprayed were melted brown slime that dried up without producing spores. Spraying it with vinegar was so much easier than trying to dig it up and move it or throwing out a whole layer of mulch. This seems to do the trick, but I'm not a scientist I just tried different things to see what works. 

before and after get rid of dog vomit fungus
24 hours later

The thing sent out some extra yellow piles that I also sprayed and they dissolved the same as before. Again, this will definitely add some acid to your mulch bed but it didn't take that much to treat the dog vomit and so far so good I haven't had any damage to my plants. 

Saturday, May 7, 2022

What 5 Yards of Mulch Looks Like and How Long It Took To Spread

This was my first year getting bulk mulch delivered rather than buying bags of mulch from Lowes. Like many homeowners, I had no idea how to estimate the number of cubic yards of mulch I would need (and I've seen neighbors end up with a mountain of mulch for just a few flower beds). I needed a way to estimate how much mulch I would need in cubic yards. The mulch website had a calculator on it, but when I added up all my bed dimensions it came out with a wacky number like 100 yards of mulch. 


What worked for me, and again I'm not an expert, I went to Google Maps and used the measure tool. Right click on the map and you can create a measurement. I measured the perimeter of my mulch beds around my house and then assumed a 3 foot width of the beds for the entire length on the mulch calculator. I didn't include the mulch around the trees or other beds because I assumed the measurement of the driveway and other areas where I don't have mulch would cancel out. Maybe I got lucky, but this worked out perfectly for me with 5 yards of mulch covering my beds with none left over. 


5 yards of mulch in a pile on the driveway


using google maps to estimate yards of mulch
Using Google Maps to estimate yards of mulch

The delivery driver was a pro and got most of the mulch right in the center of the tarp. It was funny when he opened the doors the mulch was packed in and stayed in the shape of the truck. I was definitely happy I used a tarp - not because I was worried about getting the driveway dirty, but because as the pile gets smaller and more spread out, it's nice to have an easy way to pool the mulch back in the middle so it's scoopable. 


mulch being delivered in truck on driveway

I did this all by myself in a weekend and it took me about 10 hours. I think it took longer than it should have because I was carefully spreading and shaping edges as I was going instead of just quickly dumping. 


Some tools that came in extremely handy (I will never spread mulch again without them!) are a pitchfork and a heavy duty wagon. The tines on the pitchfork let it easily glide into the mulch but then the mulch clumps itself together so really it's like a shovel and the mulch doesn't really fall between the tines of the fork. The heavy duty wagon spreads the weight out over 4 wheels so it doesn't leave ruts in my lawn like a wheelbarrow would. The Gorilla Cart even has a dumping action that saved me time.


The whole thing would have gone faster if I wasn't also shaping the bed as I was going, here are some more photos:


remove sod create new mulch bed

new mulch bed

Helleborus and holly with new mulch around them

The downspout by my new mulch bed is the strongest current when it rains, so I wanted to extend the downspout without making it look ugly. I tried these brown downspout extenders which are pretty good - but 2 of them don't quite get me to the edge of the bed so I added rocks. It's temporary but at least now I'm not drowning my plants and washing away all the mulch. 


Downspout extender under mulch with rocks

Thursday, June 17, 2021

New Plants Around Utility Boxes

I'm no stranger to hiding utility boxes with plants to not only make it more attractive but also make it easier to mow around. Before I did this utility box landscaping my neighbor said he was coming out with scissors to cut the grass in between the power box and internet box in the front yard. 

plants around utility boxes

utility box landscaping photos
Here is an After photo from October


At our old house, I had a great utility box combination of feather reedgrass, coneflower, iris, and asters. I wanted to try something a little different here because all of those plants die to the ground in the winter and only do a good job hiding the utility boxes for 7 months out of the year. So I wanted to do something evergreen this time but I didn't want to have to wait years for it to grow either. 

My compromise was to plant one emerald green arborvitae in the front that will eventually get 4 feet wide and hide most of the boxes from the front view, but in the meantime I wanted to hide the boxes from the side so I used one of my favorite ornamental grasses 'Northwind' switchgrass. 

'Northwind' switchgrass

I also got a few drought tolerant flowers called Gaillardia aristata 'Spintop Copper Sun' that won't really get tall enough to hide anything but they are blooming like crazy and don't need a lot of water. 

Gaillardia aristata 'Spintop Copper Sun'

I started by rounding up the grass in the shape of the bed using a hose as a guide for the shape. I waited about a week for the grass to fully die and added a very thick layer of mulch. I called 811 before the dig to mark the utility lines, but since my mulch was so thick I actually didn't even dig into the ground I just pushed the mulch aside, added topsoil and the plants are all planted above the clay soil in nice mounded topsoil and surrounded by mulch. 

arborvitae emerald green

I don't have anything in the back yet and I'd still like to add some coneflower, but for now at least I don't have to mow between the boxes and it looks a little better. The plants are so small that they aren't completely hiding anything really, not yet anyway. 

Monday, May 31, 2021

This Is How I Start a New Mulch Bed from Scratch

How do you start a brand new mulch bed over grass for the first time? Here is my method that I've used a few times but it's certainly not the only way to do it. I'll show step by step photos and talk about the pros and cons of this method compared to other ways to do it. 

The very first thing I like to do is to visualize the shape of the bed by laying out a garden hose in the shape that the bed will be in eventually. I like nice gradual curves, so a garden hose is the perfect outline to start planning, then you can step back and make sure you like it. 

Using a garden hose to plan out the shape of the new mulch bed

I'm glad I did this because when I took a step back I realized I wanted more of a concave curve at the top rather than convex to basically make the whole thing look like a kidney bean or fat boomerang. The kidney bean shape is very common in landscaping and the gradual curves are pleasing to the eye. The benefit of the curve on the high side of the yard is that water will flow around it on its way down hill. 

My next step while the hose is still in place is to just nuke everything with roundup. You could also edge around the whole thing with a half moon edger and peel up the sod, but this grass has been growing here for a few months and the sod is really hard to dig up. Plus I want as much topsoil as I can get in the new bed so I don't want to remove the sod layer I want to keep all that material in the bed and even build it up from there. 

I let the roundup start to take effect before removing the hose to make sure I have my outline. On a hot day in direct sunlight, the roundup should have a noticeable impact on the grass even in a couple hours. 

hose shape of mulch bed
Remember to rinse your hose off because now it's covered in RoundUp

The next morning it looked like this...

Shape of new mulch bed in dead grass

I did have to go back and touch up a few parts with extra grass killer, a few days later it was evenly crispy. I let it stay like this for about a week and a half - I didn't want to plant anything into a bed of roundup right away. I wonder what the neighbors thought with this big bean shape patch of dead grass. 

Shape of new mulch bed in dead grass

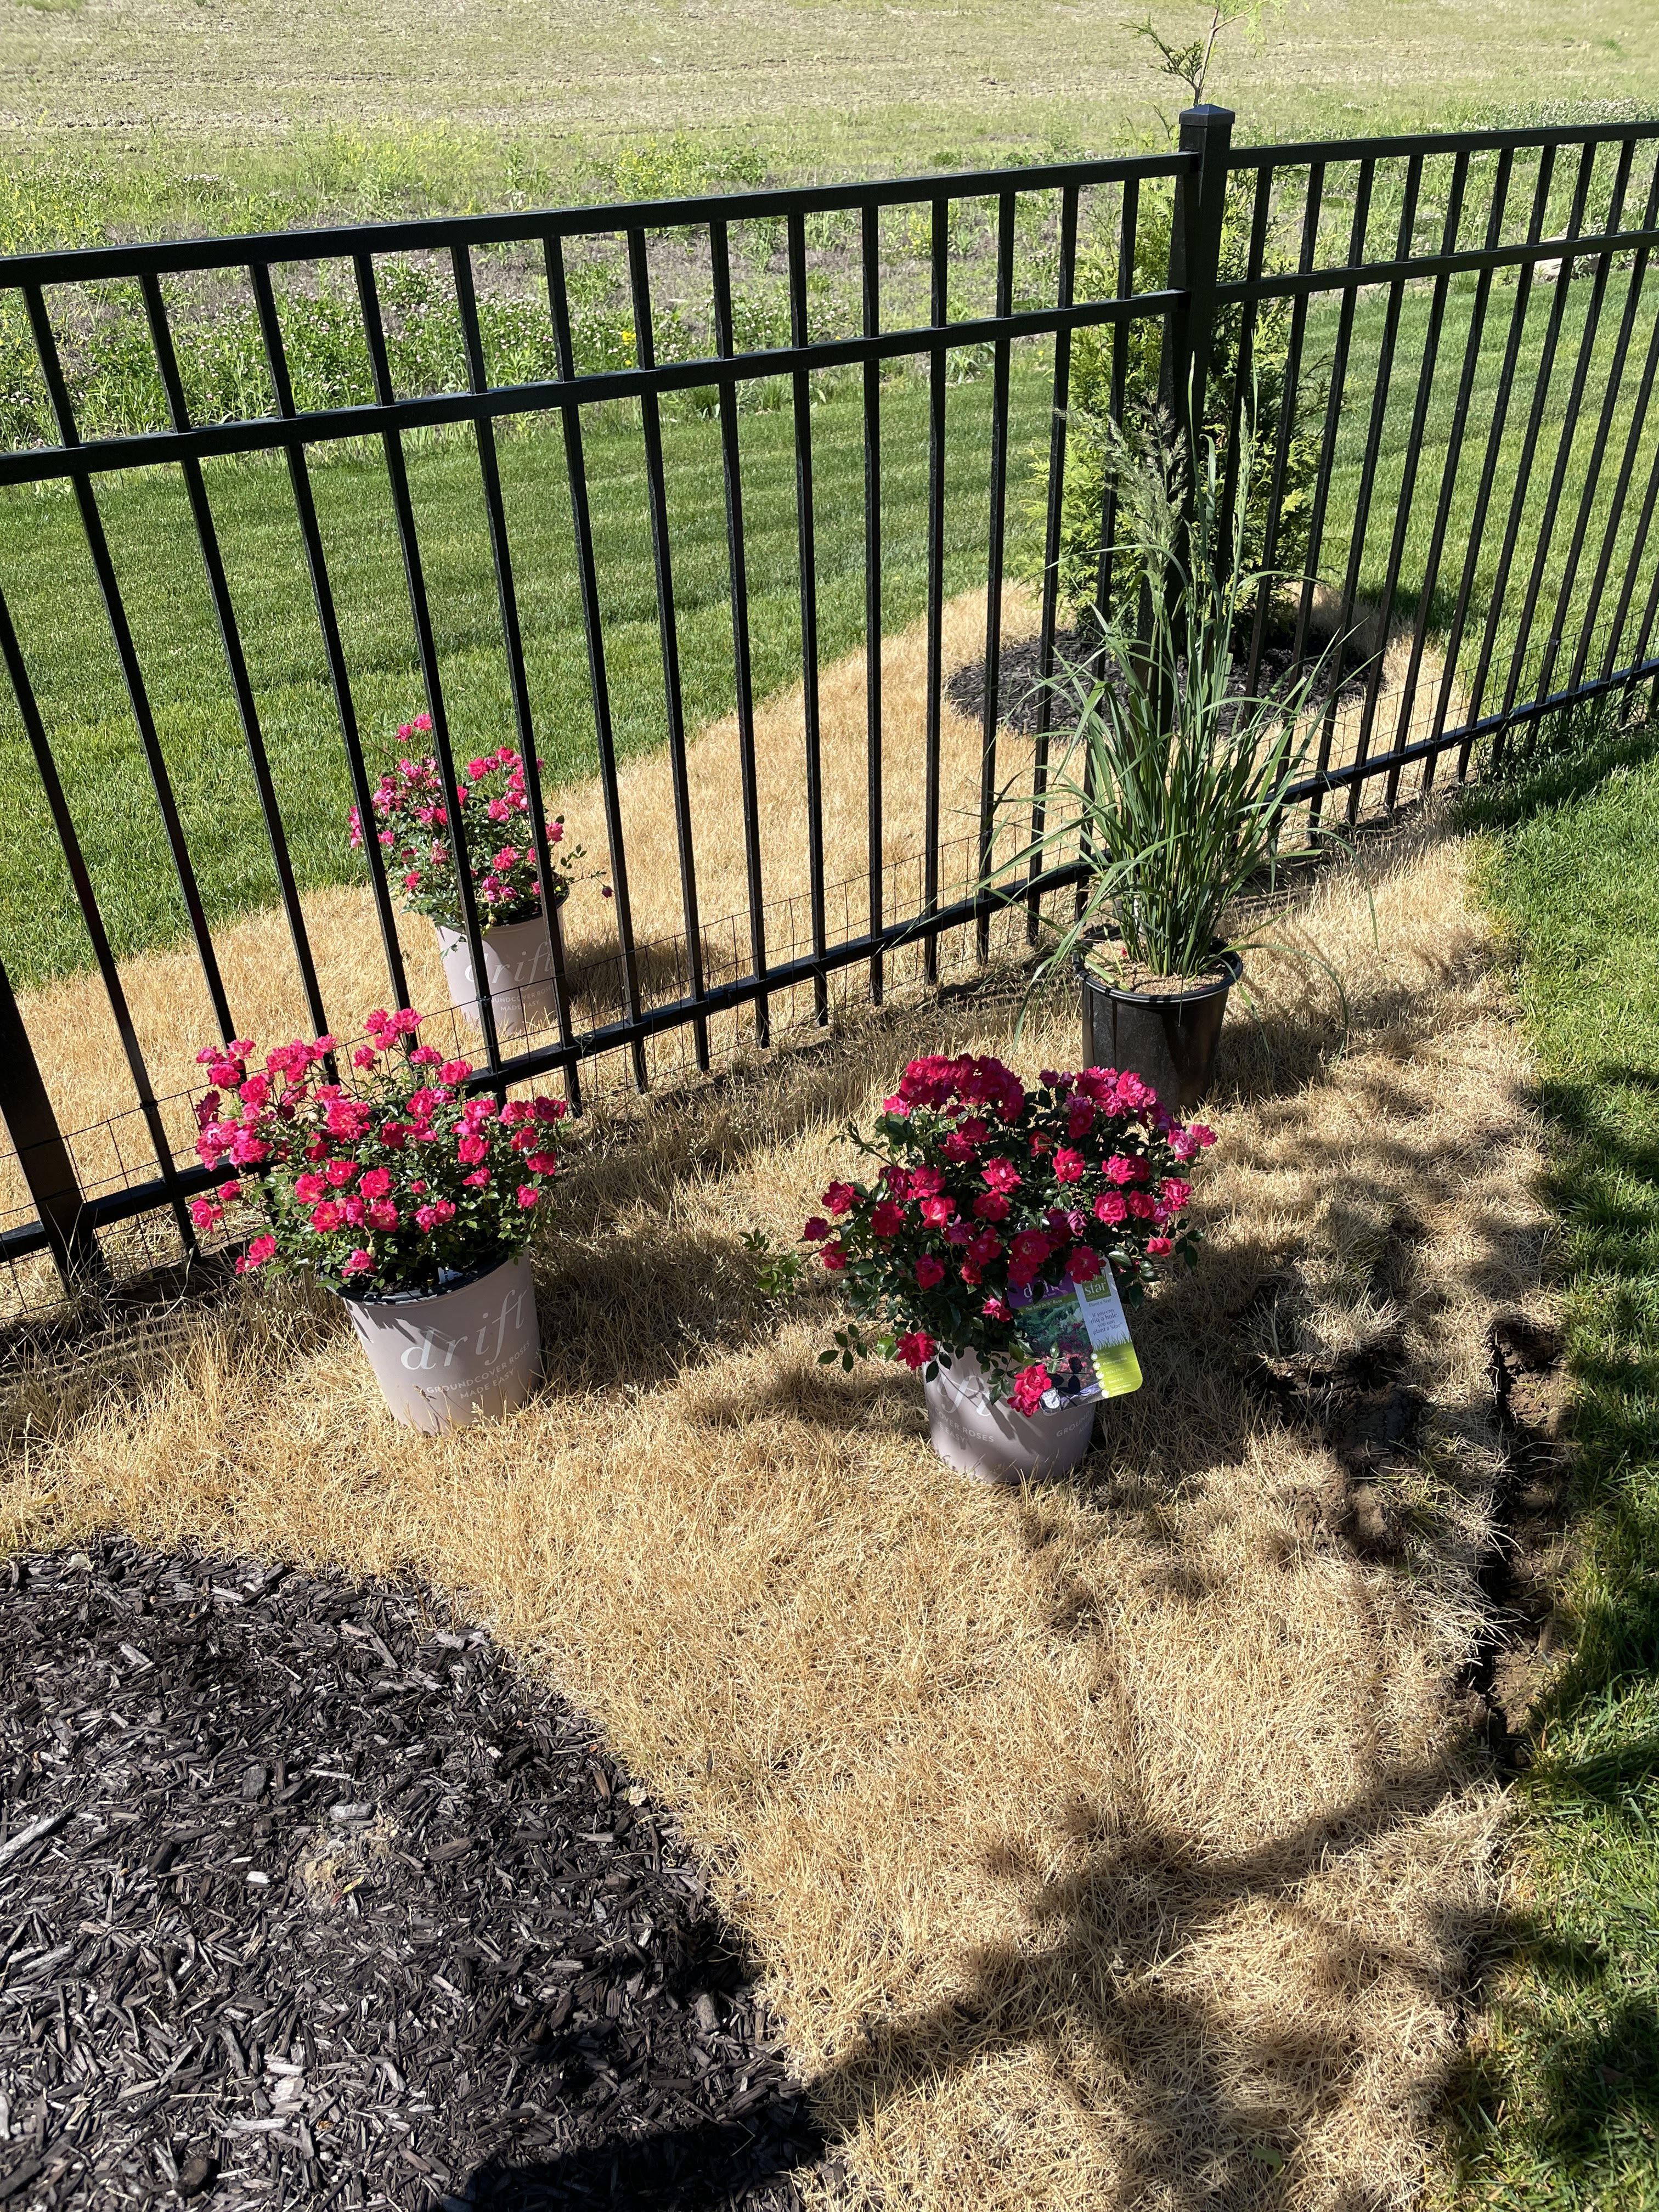
Next we bought a bunch of plants to fill the bed, in this case we got a few colors of Drift roses. Knowing I wanted to raise the bed up a little above the sod line, I dug shallow holes for the plants and mounded fresh topsoil mixed with peat moss around them. 

arranging plants in new bed shape

Having the shape of the bed outlined in dead grass made it easy to arrange the plants how I wnated them. It's at this point I also went around the entire bed with a half moon edger and cut a crisp line the whole way around. Then I went back around again with the edger at an angle to cut a V shape (or in this case more of a moat) into the edge. 

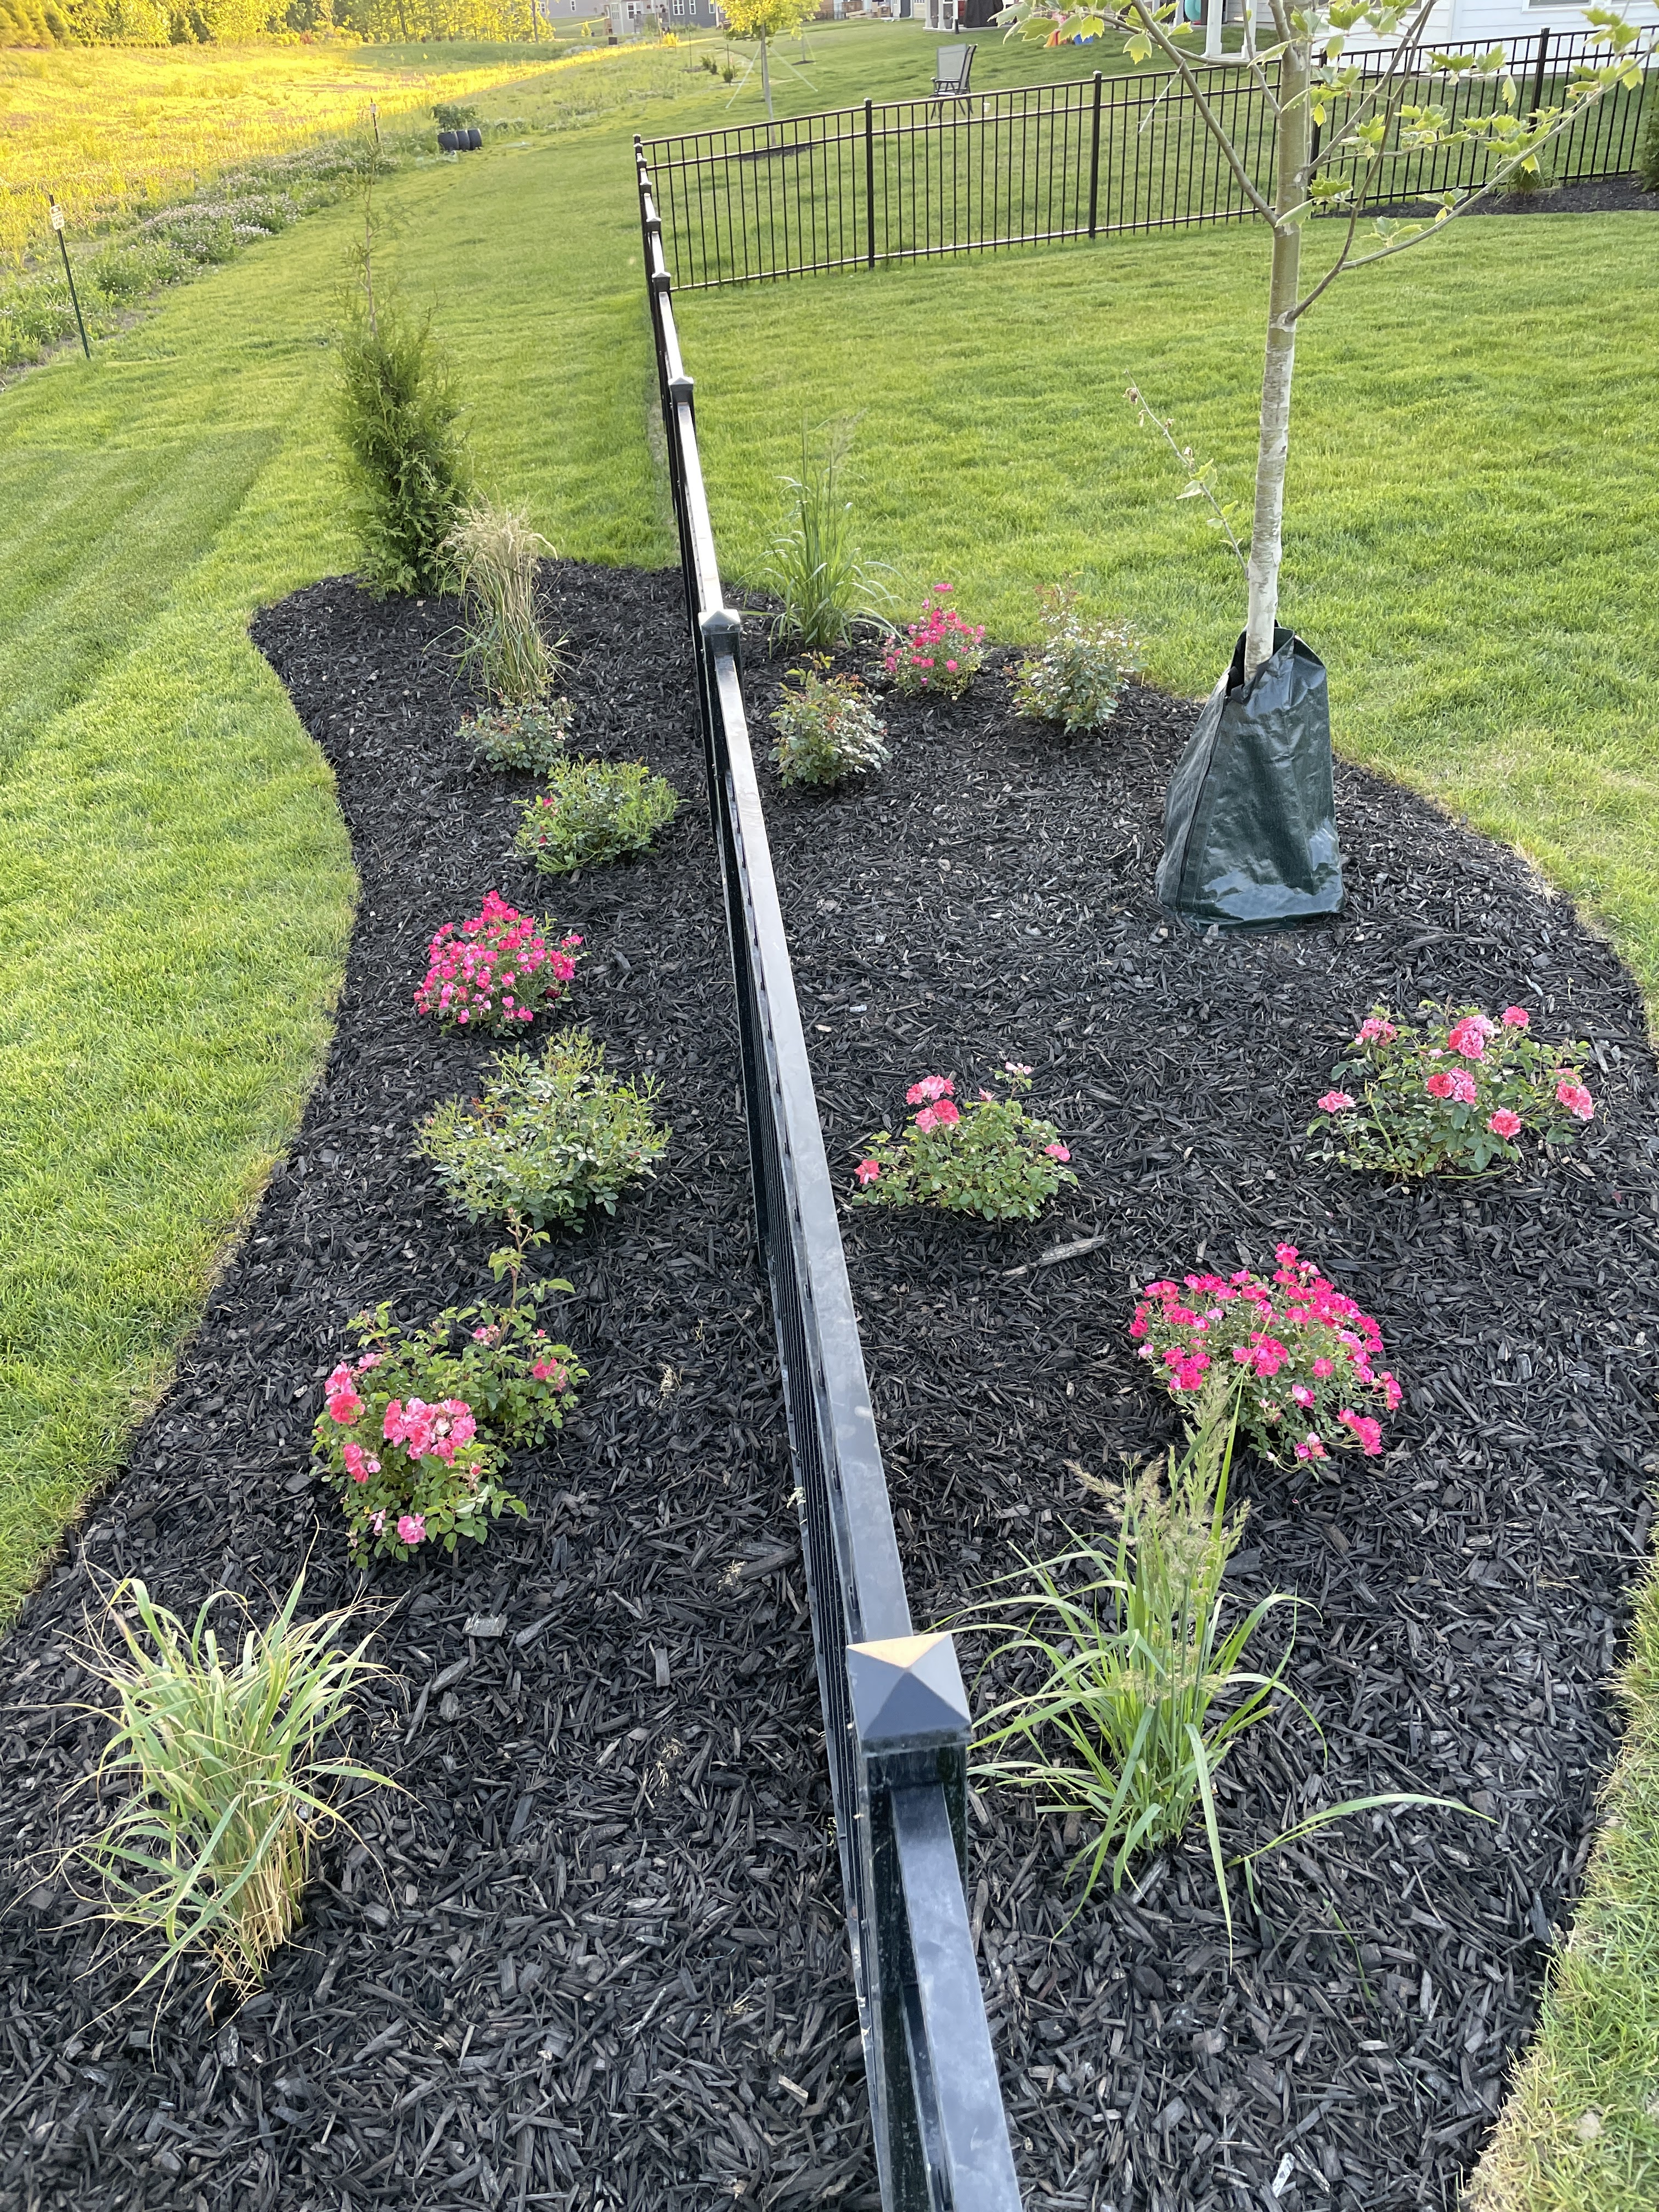
drift roses in mulch bed

The whole thing basically has a 2 inch deep moat around it cut below the sod line. When you then back fill it with mulch it comes up to a deep vertical edge that helps to keep the mulch in place and also helps prevent the grass from spreading into the mulch bed because it hits air instead of soil when it tries to spread horizontally. 

bed edge with air gap

So there you have it, here is a before and after photo. I just love how odd it looks having a perfectly sculpted patch of dead grass in the yard and then the after photo making it look like the mulch bed has been there all along. That's really the goal to make it look like it's natural or supposed to be there and now that you just came along and spilled mulch on top of the grass. 

before and after new mulch bed
Before and after


Sunday, May 9, 2021

New Additions: Inkberry, Castle Spire, and Bird's Nest Spruce

We've been trying to figure out what to do with this front bed, and maybe it's the slow cold spring we're having or the fact that we're already looking forward to Christmas this year, but we're going with a mostly broadleaf evergreen front bed with different kinds of holly. 

We're already a week into May and the lows are still hovering around 34°F at night. I'm so glad I didn't order a bunch of perennial flowers because I'd be frantically running out to cover them every night. That could be why the prospect of a holly garden was so appealing. 

We also had a stroke of luck or catalyst push us to action, we were going on a walk and decided to go down the side street that is still under construction and saw a bunch of holly pushes on the curb. I asked the owner if he was just throwing them out and he said yes, so we ran to get the RAV4 and loaded up 4 free American holly bushes (and 3 forsythia that we don't know what to do with). 

These new bushes were the catalyst that made us go to Lowe's for topsoil and mulch, and then I found Shamrock Inkberry that we've actually been on the hunt for for about a week (we bought the only 2 they had), and Chris saw these cute blue holly called Castle Spire (Ilex x meserveae 'Hachfee'). Chris helped and we planted all of them along with 3 of the 4 free holly that night before the rain started. I also got my bird's nest spruce in the ground that I knew I wanted I just didn't know where to put it. It will get much bigger than the current spot allows but it will be years to go. 

plants in pots with shovel before being planted
Left: free American holly shrub, Shamrock Inkberry, Castle Spire blue holly

plants piled in back of SUV
Free plants loaded up in the back of the car (that Chris just got done vacuuming out)

holly shrubs under window
Two additional free holly shrubs under the window in the front side bed

Shamrock Inkberry (right) and Castle Spire holly (left)

Bird's Nest Spruce
Bird's Nest Spruce

I hope the spacing is adequate, I hear the holly can get pretty big - but we are excited to have some variety in our mostly broadleaf evergreen front bed for Christmas lights, red holly berries, and year round structure. 

broadleaf evergreen landscaping plants
Hoping for year round structure in a front bed that will never die to the ground